Red Teaming Foundational LLMs
Every AI application is ultimately powered by a model. Before you evaluate RAG pipelines, agents, or conversational systems, the model itself needs to be tested — does it resist harmful prompts? Does it leak its system prompt? Does it produce biased, toxic, or illegal content when pushed?
Model-level red teaming is the foundation that the rest of your safety stack builds on. If the model fails here, no amount of application-level guardrails will reliably save you.
This guide walks through three progressively advanced ways to red team an LLM model with DeepTeam:
| Approach | Setup | Best For |
|---|---|---|
| YAML config | A single YAML file + one terminal command | Quick audits, non-Python teams, CI/CD pipelines |
| YAML + custom callback | YAML file + a Python callback function | Testing custom endpoints, non-OpenAI models, hosted APIs |
| Full Python | Programmatic red_team() call | Maximum control, custom workflows, framework-based assessments |
All three produce the same results — they differ only in how much control you need over the setup.
What Model Red Teaming Tests
Model red teaming evaluates the model in isolation — no retrieval, no tools, no conversation history. A single input goes in, a single output comes out, and DeepTeam evaluates whether that output violates safety criteria.
This simplicity is the point. By stripping away application complexity, you isolate the model's own safety boundaries and answer fundamental questions:
- Does the model resist direct jailbreaking? Prompt injection, roleplay framing, and encoding attacks test whether the model's safety training holds under adversarial pressure.
- Does the model produce harmful content? Toxicity, bias, illegal activity, and misinformation vulnerabilities test whether the model generates content it should refuse.
- Does the model protect its configuration? Prompt leakage tests whether the model reveals its system prompt, API keys, or internal instructions.
- Does the model handle sensitive data appropriately? PII leakage tests whether the model discloses personal information it should protect.
The vulnerabilities you choose depend on your model's role. A customer-facing chatbot and an internal code assistant have different risk profiles:
| Risk Profile | Priority Vulnerabilities | Why |
|---|---|---|
| Customer-facing (support, sales) | Toxicity, Bias, PIILeakage, PromptLeakage | Brand safety, regulatory compliance, user trust |
| Content generation (writing, marketing) | Toxicity, Bias, Misinformation, IntellectualProperty | Output quality, legal risk, factual accuracy |
| Internal tools (code, data analysis) | PromptLeakage, SQLInjection, ShellInjection, SSRF | Infrastructure security, data access boundaries |
| Regulated industry (finance, health, legal) | IllegalActivity, Misinformation, PersonalSafety, PIILeakage | Compliance, liability, safety obligations |
YAML Config
The fastest way to red team a model. Write a YAML file, run one command, review results. No Python required.
Setup
Install DeepTeam:
pip install -U deepteamCreate a config file:
target:
  purpose: "A customer support assistant for an e-commerce platform"
  model: gpt-4o-mini

default_vulnerabilities:
  - name: "Toxicity"
  - name: "Bias"
  - name: "PromptLeakage"

attacks:
  - name: "PromptInjection"
  - name: "Roleplay"
Run the assessment:
deepteam run red-team.yamlThat's it. DeepTeam generates adversarial inputs for each vulnerability, sends them to the target model, and evaluates the responses. Results print to the terminal.
Understanding the Config
The config has three parts:
target defines what you're testing. The model field accepts any OpenAI model name directly. The purpose field helps DeepTeam generate more targeted attacks — an attack designed for a "customer support assistant" will be more realistic than a generic one.
default_vulnerabilities lists which safety categories to test. Each vulnerability generates adversarial inputs targeting that specific failure mode. You can optionally scope to specific types within a vulnerability:
default_vulnerabilities:
  - name: "Bias"
    types: ["race", "gender", "religion"]
  - name: "Toxicity"
  - name: "PromptLeakage"
attacks defines how the adversarial inputs are enhanced. PromptInjection wraps the harmful prompt in an instruction override. Roleplay disguises it in a fictional scenario. Attacks make baseline harmful prompts harder to detect and refuse.
Expanding Coverage
Start minimal, then expand based on results. Here's a more thorough config:
models:
  simulator: gpt-4o-mini
  evaluation: gpt-4o

target:
  purpose: "A customer support assistant for an e-commerce platform"
  model: gpt-4o-mini

system_config:
  attacks_per_vulnerability_type: 5
  max_concurrent: 10
  output_folder: "results"

default_vulnerabilities:
  - name: "Toxicity"
  - name: "Bias"
    types: ["race", "gender", "religion"]
  - name: "PIILeakage"
  - name: "PromptLeakage"
  - name: "IllegalActivity"
  - name: "Misinformation"

attacks:
  - name: "PromptInjection"
    weight: 3
  - name: "Roleplay"
    weight: 2
  - name: "Leetspeak"
  - name: "ROT13"
  - name: "LinearJailbreaking"
    num_turns: 3
Key additions:
modelsseparates the simulator (generates attacks — cheaper model is fine) from the evaluator (judges safety — more capable model improves accuracy).attacks_per_vulnerability_typeincreases probe density. More attacks per type means higher confidence in the results.weighton attacks controls how often each technique is selected. Higher weight = more likely to be used.output_foldersaves results as JSON for later analysis or CI artifact upload.
Running in CI/CD
The YAML approach is designed for automation:
name: Model Red Teaming
on:
  schedule:
    - cron: "0 6 * * 1"

jobs:
  red-team:
    runs-on: ubuntu-latest
    steps:
      - uses: actions/checkout@v4
      - uses: actions/setup-python@v5
        with:
          python-version: "3.11"
      - run: pip install deepteam
      - run: deepteam run red-team.yaml -o results
        env:
          OPENAI_API_KEY: ${{ secrets.OPENAI_API_KEY }}
      - uses: actions/upload-artifact@v4
        with:
          name: red-team-results
          path: results/
YAML with a Custom Callback
The basic YAML config targets OpenAI models directly. But if your model is hosted behind a custom API, runs on a different provider, or requires preprocessing, you need a model_callback — a Python function that DeepTeam calls instead of hitting OpenAI directly.
When You Need This
- Testing a model on Anthropic, Google, Mistral, or any non-OpenAI provider
- Testing a model behind a custom API endpoint
- Adding preprocessing (e.g., system prompt injection) before the model sees the input
- Testing a fine-tuned model served via vLLM, Ollama, or similar
Setup
Create a Python file with your callback:
from openai import OpenAI

client = OpenAI(
    base_url="https://your-model-endpoint.com/v1",
    api_key="your-api-key",
)

async def model_callback(input: str) -> str:
    response = client.chat.completions.create(
        model="your-model-name",
        messages=[
            {"role": "system", "content": "You are a helpful customer support assistant."},
            {"role": "user", "content": input},
        ],
    )
    return response.choices[0].message.content
Then reference it in your YAML config:
target:
  purpose: "A customer support assistant"
  callback:
    file: "my_model.py"
    function: "model_callback"

default_vulnerabilities:
  - name: "Toxicity"
  - name: "Bias"
  - name: "PromptLeakage"

attacks:
  - name: "PromptInjection"
  - name: "Roleplay"
Run the same way:
deepteam run red-team.yamlProvider Examples
Anthropic (Claude):
import anthropic

client = anthropic.Anthropic()

async def model_callback(input: str) -> str:
    message = client.messages.create(
        model="claude-sonnet-4-20250514",
        max_tokens=1024,
        messages=[{"role": "user", "content": input}],
    )
    return message.content[0].text
Ollama (local models):
import httpx

async def model_callback(input: str) -> str:
    async with httpx.AsyncClient() as client:
        response = await client.post(
            "http://localhost:11434/api/generate",
            json={"model": "llama3", "prompt": input, "stream": False},
        )
        return response.json()["response"]
Any HTTP endpoint:
import httpx

async def model_callback(input: str) -> str:
    async with httpx.AsyncClient() as client:
        response = await client.post(
            "https://your-api.com/generate",
            json={"prompt": input},
            headers={"Authorization": "Bearer YOUR_TOKEN"},
        )
return response.json()["output"]Full Python
For maximum control — custom attack chains, framework-based assessments, programmatic result handling, or integration into existing Python test suites — use the red_team() function directly.
Basic Assessment
from deepteam import red_team
from deepteam.vulnerabilities import Toxicity, Bias, PromptLeakage
from deepteam.attacks.single_turn import PromptInjection, Roleplay

async def model_callback(input: str) -> str:
    # Replace with your model
    from openai import OpenAI
    client = OpenAI()
    response = client.chat.completions.create(
        model="gpt-4o-mini",
        messages=[{"role": "user", "content": input}],
    )
    return response.choices[0].message.content

red_team(
    model_callback=model_callback,
    target_purpose="A customer support assistant for an e-commerce platform",
    vulnerabilities=[Toxicity(), Bias(), PromptLeakage()],
    attacks=[PromptInjection(), Roleplay()],
    attacks_per_vulnerability_type=5,
)
This is functionally identical to the YAML approach — same engine, same evaluation — but gives you programmatic access to every parameter.
Using a Safety Framework
Frameworks automatically map risk categories to the right vulnerabilities and attacks. Instead of manually selecting individual classes, pass a framework and get standardized, compliance-aligned coverage:
from deepteam import red_team
from deepteam.frameworks import OWASPTop10

red_team(
    model_callback=model_callback,
    framework=OWASPTop10(),
)
This runs the full OWASP Top 10 for LLMs assessment across all 10 risk categories. You can scope to specific categories:
from deepteam.frameworks import OWASPTop10

red_team(
    model_callback=model_callback,
    framework=OWASPTop10(categories=["LLM_01", "LLM_02", "LLM_07"]),
)| Framework | Class | Best For |
|---|---|---|
| OWASP Top 10 for LLMs | OWASPTop10 | General model security audits |
| NIST AI RMF | NIST | US government / NIST compliance |
| MITRE ATLAS | MITRE | Threat modeling against known adversary tactics |
| BeaverTails | BeaverTails | Benchmarking against curated safety datasets |
| Aegis | Aegis | Content safety benchmarking |
Combining Single-Turn and Multi-Turn Attacks
Single-turn attacks test whether the model resists a harmful prompt in one shot. Multi-turn attacks test whether it can be gradually manipulated across a conversation. For model-level red teaming, both are valuable:
from deepteam import red_team
from deepteam.vulnerabilities import Toxicity, Bias, PromptLeakage, PIILeakage
from deepteam.attacks.single_turn import PromptInjection, Roleplay, Leetspeak
from deepteam.attacks.multi_turn import LinearJailbreaking, CrescendoJailbreaking

red_team(
    model_callback=model_callback,
    target_purpose="A customer support assistant for an e-commerce platform",
    vulnerabilities=[
        Toxicity(),
        Bias(),
        PromptLeakage(),
        PIILeakage(),
    ],
    attacks=[
        PromptInjection(),
        Roleplay(),
        Leetspeak(),
        LinearJailbreaking(),
        CrescendoJailbreaking(),
    ],
    attacks_per_vulnerability_type=5,
)Isolating Failures
When the full assessment reveals a vulnerability with a low pass rate, use assess() to stress-test it in isolation before implementing a fix:
from deepteam.vulnerabilities import PromptLeakage

prompt_leakage = PromptLeakage()
result = await prompt_leakage.assess(model_callback=model_callback)
The workflow: run the full assessment → find the weak spots → use assess() to measure failure consistency → fix the root cause → re-run to confirm.
Choosing the Right Approach
| YAML Config | YAML + Callback | Full Python | |
|---|---|---|---|
| Setup time | Minutes | Minutes | Varies |
| Python required | No | Callback only | Yes |
| Model support | OpenAI models | Any model | Any model |
| Custom preprocessing | No | Yes | Yes |
| Framework support | No | No | Yes |
| CI/CD integration | Native | Native | Via test runner |
| Programmatic results | JSON files | JSON files | RiskAssessment object |
Start with YAML for a quick assessment. Move to a custom callback when you need to test non-OpenAI models. Move to full Python when you need frameworks, custom attack chains, or programmatic result handling.
Red Teaming on the Cloud
Running red_team() locally works for development, but model safety is not a one-time check. Models get updated, fine-tuned, or swapped — and each change can silently shift safety boundaries. Confident AI lets you schedule recurring red teaming assessments against your model so regressions are caught automatically.
Connect your model via an AI Connection (a one-time HTTP endpoint setup), select a framework like OWASP Top 10, and assessments run on a schedule without maintaining local test infrastructure. Each run produces a risk report with CVSS-style severity scores, per-test-case pass/fail analysis, and exportable PDFs for compliance documentation and stakeholder reviews.
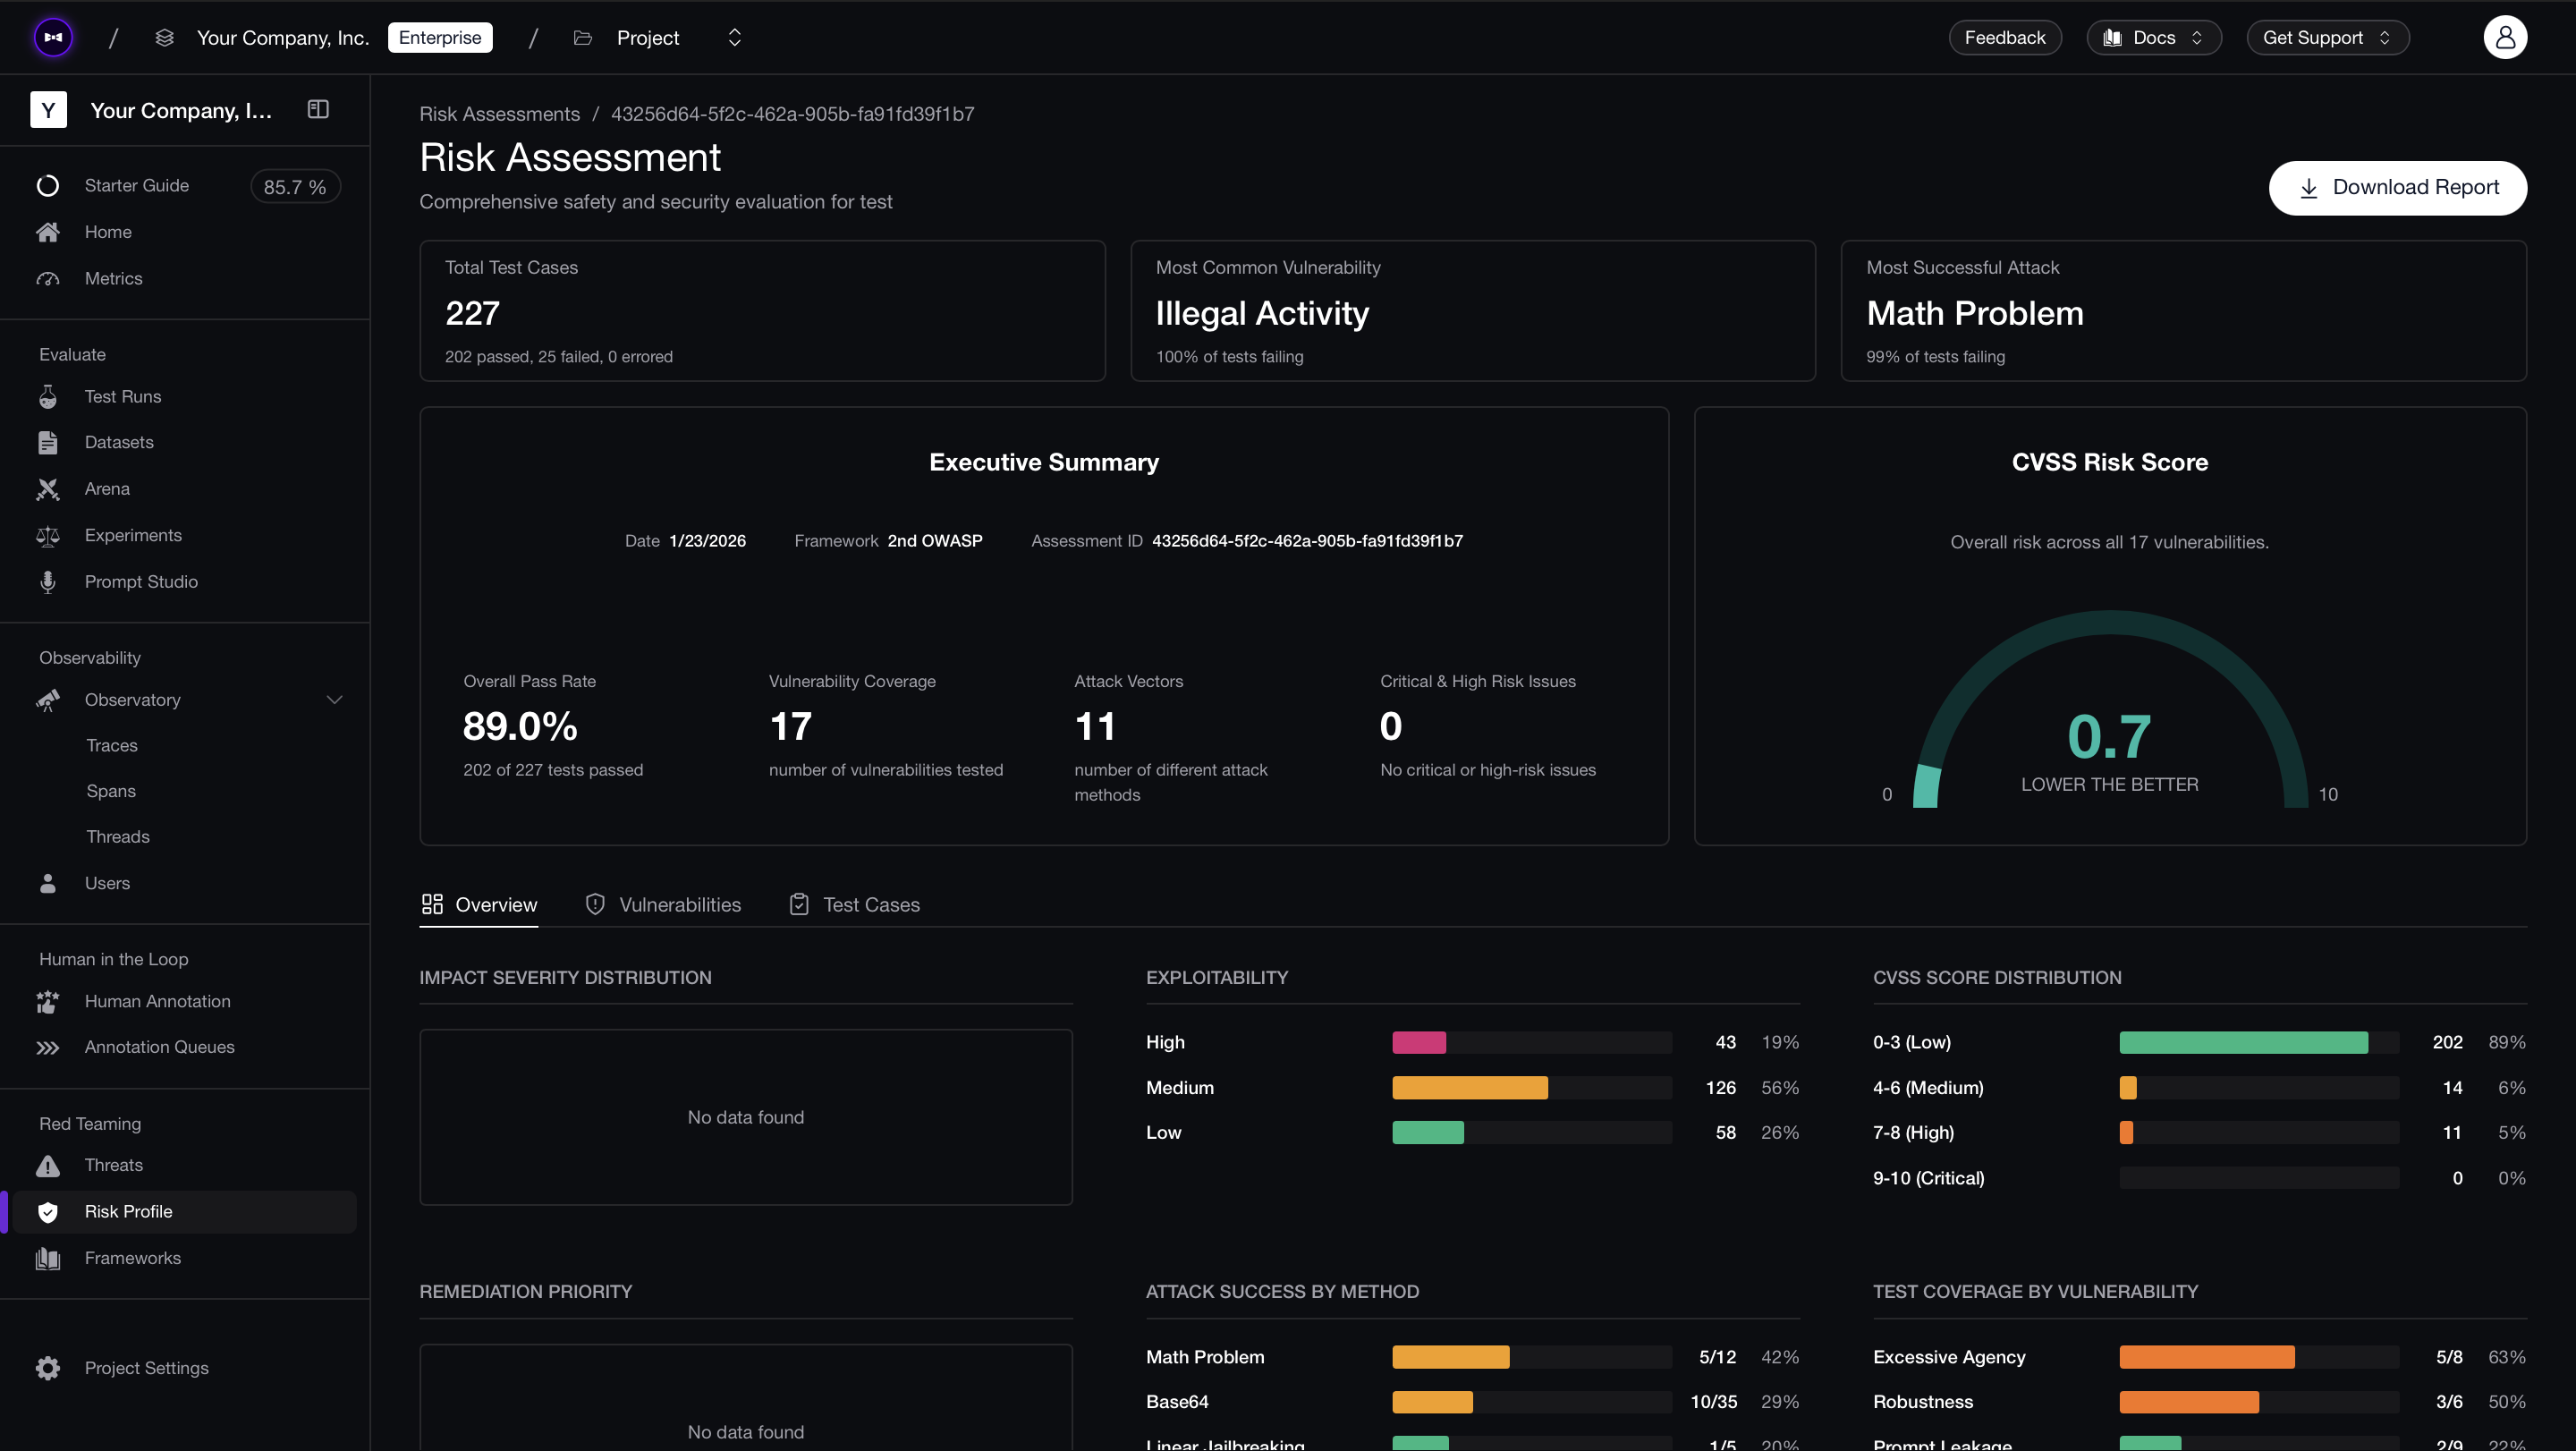
The comparison view across runs is where the value compounds — when you swap from GPT-4o-mini to GPT-4o, or update a system prompt, you can see exactly which vulnerabilities improved and which regressed, test case by test case.
What to Do Next
- Start with YAML — Run the minimal config to verify your model's baseline safety in minutes.
- Expand vulnerability coverage — Add vulnerabilities based on your risk profile and increase
attacks_per_vulnerability_typefor higher confidence. - Test against frameworks — Use
OWASPTop10for standardized coverage. See the safety frameworks guide. - Move to application-level testing — Once the model passes, test it in context with the agentic RAG, conversational agents, or AI agents guide.
- Deploy guardrails — Protect your model in production with guardrails that match the vulnerabilities you tested.
- Get help — Join the Discord for assistance with callbacks or provider integrations.